How do I set up my eero PoE 6?
Your eero PoE 6 provides fast, reliable wifi throughout your space using Power over Ethernet (PoE). Follow these steps to mount, connect, and configure your device.
What's in the box?
Your eero PoE 6 package includes:
One eero PoE 6 device
One mounting bracket
Four drywall anchors (30 mm)
Four Phillips screws (#8-15x30 mm)
What do I need to set up my eero PoE 6?
Gather these items:
Phillips head screwdriver
Drill with drill bits
Internet connection and modem
Cat5e cable or better
Smartphone or tablet with the eero App
Note: Your eero PoE 6 gets power through its Ethernet cable using PoE (Power over Ethernet) standards 802.3af, 802.3at, or 802.3bt. If you don't have PoE equipment, use an eero 15 W USB-C power adapter (sold separately).
What do I need to know about my network setup?
Your eero PoE 6 works best when connected to a PoE power source. Here's what you need to know:
Power requirements: Each eero PoE 6 needs 15.4 W of power from your PoE equipment. Make sure your power supply can handle all the devices you plan to connect.
Network layout: You'll need a gateway eero between your modem and your PoE switch. The gateway eero manages your internet connection and routes traffic to your other eeros. If your gateway is also an eero PoE 6, it'll need its own power source—either a PoE injector or the 15 W power adapter.
Connection port: Connect your PoE cable to the outer port marked "2.5" on your eero PoE 6. This port handles both your internet connection and power input.
Professional installation recommended: Setting up PoE networks can be complex. We recommend working with a professional installer to ensure everything's configured correctly. See below for our recommended topology setup:
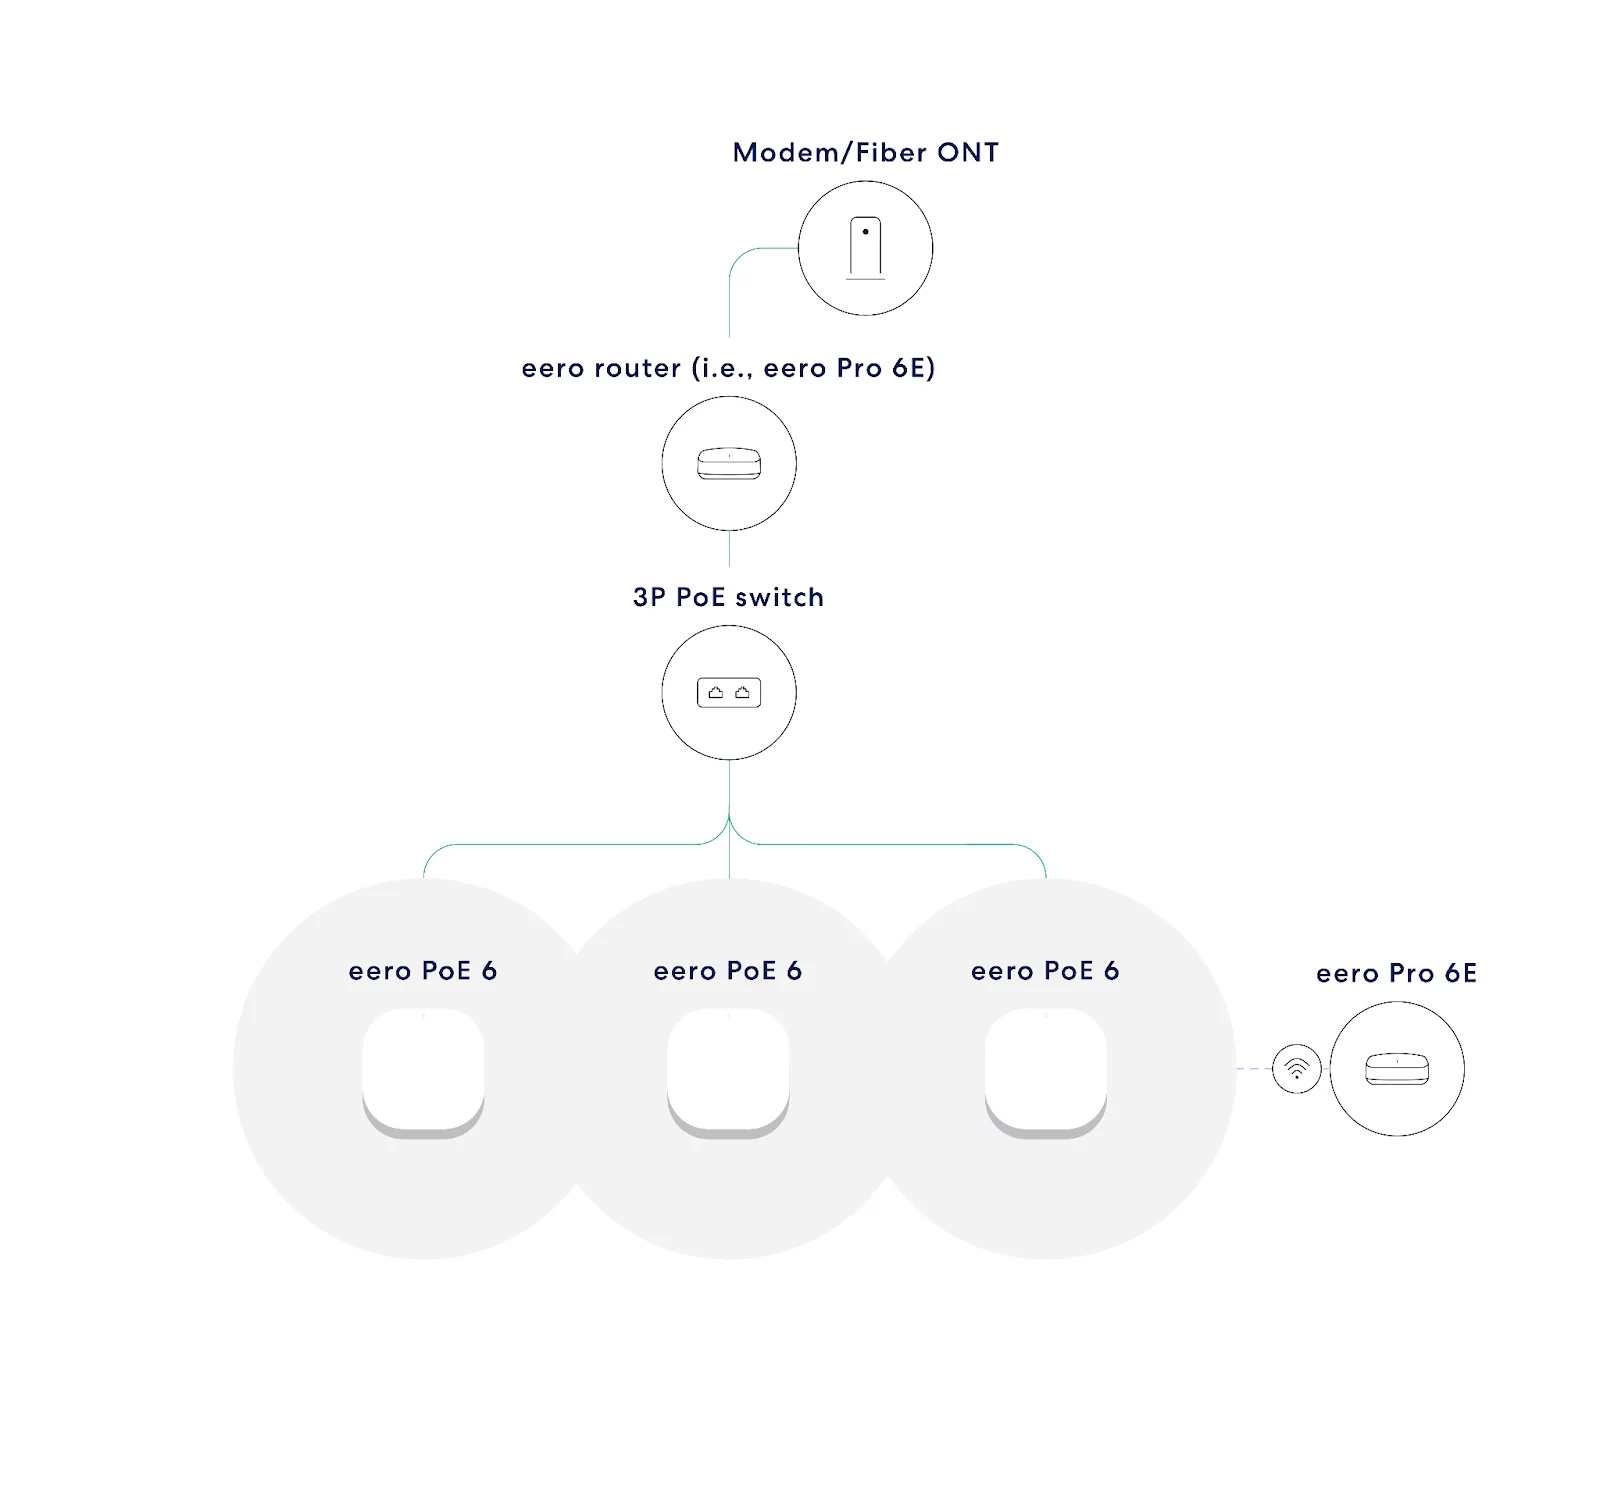
Note: If your network is already in bridge mode, temporarily switch to Double NAT mode. Disable bridge mode, remove your old router, and install your eero gateway. Then you can set your upstream router back to bridge mode.
How do I install my eero PoE 6?
Step 1: Prepare for installation
Choose your installation location on the wall or ceiling
Drill 6 mm pilot holes where you want to install the device
Insert the plastic drywall anchors into the pilot holes. Color-coding corresponds to the screw size chart displayed below
Step 2: Select the right screws
Use this guide to choose the correct screws for your installation:
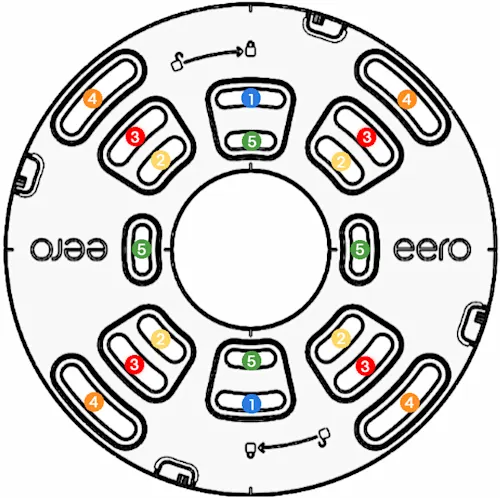
 Slot 1
 US - Single gang outlet (standard power outlet)
Screw size: 6-32
 Slot 2
 US - 3.5 in octagon
Screw size: 8-32
 Slot 3
 US - 4 in octagon and round
Screw size: 8-32
 Slot 4
 US - 4 in square and surface mounting
Screw size: 8-32
 Slot 5
EU & UK single gang outlet
Screw size: M3
Note: Screw size is the shank/main body diameter (in millimeters)-thread pitch.
Step 3: Mount the bracket
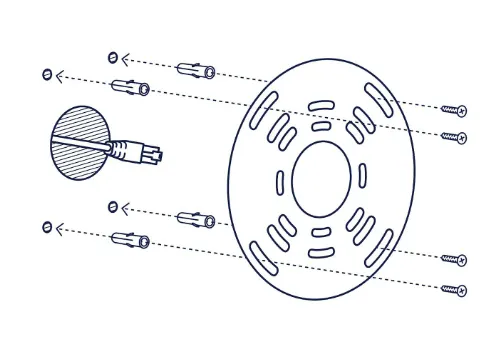
Position the mounting bracket over your pilot holes
Secure the bracket using the appropriate screws for your location
Secure the bracket firmly before continuing
Note: See the diagram below for guidance on using drywall anchors to mount the bracket to drywall:
Step 4: Connect power
Locate the 2.5 GbE port marked with the ⚡ symbol
Insert your Cat5e cable into the PoE input port
Push the cable in until you hear a click
Your eero PoE 6 powers on automatically once connected.
Note: If you'd prefer to use a USB-C power adapter instead of PoE, it's sold separately.
Your eero PoE 6 uses different colored lights to show you what's happening. See What do the colors of the LED light on my eero mean?
Step 5: Attach the device
Place your eero PoE 6 onto the mounting bracket
Turn the device clockwise until you hear a click
Keep turning until you hear a snap—it's now securely in place
How do I complete setup in the eero App?
Once your device is mounted and powered on, complete setup in the eero App:
Open the eero App on your smartphone
Follow the prompts to add your new eero PoE 6
The app will guide you through connecting to your network